A Scrolling Tile Game
View Shockwave Demo | Download Source Movie
In the previous tutorial, we looked at creating a scrolling isometric game by creating a large rendered version of the map and then copying a smaller 'view' of this image. In this version, we are going to look at another technique for scrolling tiles that involves only painting the visible tiles directly into the 'view'. We are also going to start introducing more objects into the system: a new 'game display' object for managing our off-screen buffer and painting the buffer to the screen, and well as some overlay objects for painting text to the game display (such as high scores and messages).
Scrolling a rectangular grid of tiles
Like with the previous examples, the 'map' is a list of lists that will look something like this:
Map = [

[tile, tile, tile, tile],

[tile, tile, tile, tile],

[tile, tile, tile, tile],

[tile, tile, tile, tile],

[tile, tile, tile, tile],

[tile, tile, tile, tile],

[tile, tile, tile, tile],

]
In this tutorial - to keep things simple - we are going to assume that the tiles are equally sized rectangles or squares. This means that tiles will not overlap each other.
To place these tiles, we loop through the list placing each tile in a row along to the right. When we get to the end of the row, we move down by a a tile-height and start again. The basic routine looks like this
x_offset = 0

y_offset = 0


repeat with y = 1 to MapList.count

  repeat with x = 1 to MapList[y].count

    thisTile = MapList[y][x]

    mappedTile = script("ISO.Tile.Mapped").new(thisTile, x_offset, y_offset)

    MapList[y][x] = mappedTile

    x_offset = x_offset + Tile_Width

  end repeat

x_offset = 0

y_offset = y_offset + Tile_Height

end repeat
Now, when we actually paint the tiles to the output image, we are only going to paint the tiles that are visible. The number of tiles we will need to draw can be determined like this:
MaxTilesToDrawX = RectOnCanvas.width/Tile_Width +1

MaxTilesToDrawY = RectOnCanvas.height/Tile_Height +1
To paint only the visible tiles, we need to work out the top-left tile that is currently visible. This can be calculated by simply dividing the amount of pixels we have scrolled (MapXi and MapYi) by the width and height of the tiles respectively, and adding 1 to the result (since our list index starts at one, not zero).
-- work out the start and end of the x/y coordinates to draw

startX = (-MapXi/Tile_Width) + 1

startY = (-MapYi/Tile_Height) + 1

endX = Min(MapList[1].count, startX + MaxTilesToDrawX)

endY = Min(MapList.count, startY + MaxTilesToDrawY)


-- now draw the visible tiles

repeat with y = startY to endY

  repeat with x = startX to endX

    thisTile = MapList[y][x]

    thisTile.paint(canvas, MapXi,MapYi)

  end repeat

end repeat
Note that even though we are only painting the visible tiles, if you have 20 rows of 20 tiles visible, that is still 400 copyPixel commands - which will be slow. The trick is to find the right balance between tile size and the number of tiles visible (in the example movie, the canvas is 480×480 pixels and each tile is 48×48 pixels - meaning that there will be one hundred (10×10) copyPixels with each update).
You might also notice that some tiles will appear partly over the edges of the specified rect on the canvas. If we were painting directly to the stage, and we had a nice border around the edges of the map, then this would be a problem. To avoid this, we could either crop the individual tiles that lie along the edges, or else paint to a intermediate 'buffer' image (that is the correct size) and then paint the intermediate image to the final output.

Any tiles that go over the edges of the buffer will be effectively 'cropped' when painted on to the buffer.
In the example covered in this tutorial, we will use the second approach. The main reason for this is that we will be adding other overlays (images) to the offscreen buffer before rendering the final result.
The Game Display
The script that manages the buffer is fairly simple at this stage.
Parent Script "TileEngine.GameDisplay"


property myCanvas

property myDrect

property myBuffer

property myBufferRect


on Initialise (me, outputImg, outputRect)

  myCanvas = outputImg

  myDRect = outputRect

  myBuffer = image(outputRect.width, outputRect.height, 16)

  myBufferRect =myBuffer.rect

  myBuffer.fill(myBufferRect, rgb(0,0,0))

  myCanvas.copyPixels(myBuffer, myDRect, myBufferRect)

end


on GetBuffer (me)

  return myBuffer

end


on Paint (me)

  myCanvas.copyPixels(myBuffer, myDRect, myBufferRect)

end


on ResetBuffer (me)

  myBuffer.fill(myBufferRect, rgb(0,0,0))

end
To initialise an object created from this script, we supply an output image and a rect to use. The object will then create a 'Buffer' image which is makes available (via the GetBuffer method) to other objects for painting. The Paint method of this object will then paint the buffer image to the output canvas.
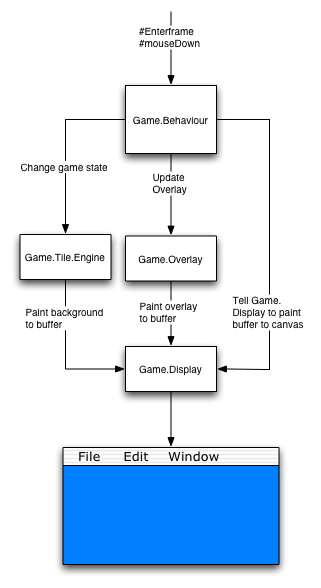
Introducing The Game Behaviour
In order to receive events (such as mouseDown and enterframe), we have been using a Behaviour which creates the tile engine and modifies the game state (scrolling the view etc) in response to those events. The game behaviour in this tutorial will also create the Game Display object, as well as the various objects used in displaying overlay images.
Our 'Game Behaviour' which creates the tile game and display objects will look something like this:
Behaviour "GameScript"


property Display

property TileEngine


on beginSprite (me)


  -- Create the display object

  Display = script("TileEngine.GameDisplay").new()

  Display.Initialise((the stage).image, rect(0,0, 480, 480))


  -- get a reference to the buffer

  buffer = Display.GetBuffer()


  -- Create the TileEngine

  TileEngine = script("TileEngine").new()

  TileEngine.Initialise(buffer, buffer.rect)


  -- Load a map (read from file, etc)

  me.LoadRandomMap()


end
In this example, the output canvas is the stage and the rect we are going to use on the stage is rect(0,0, 480, 480). In this basic example, we are simply going to scroll around the map using arrow keys. Here is the enterframe method of the game behaviour.
on enterframe (me)


    -- Handle key input

    moveH = (keyPressed(124) - keyPressed(123))

    moveY = (keyPressed(125) - keyPressed(126))

    if moveH AND moveY then pixDistance = 6.0 -- sqrt(32)

    else pixDistance = 8.0

    ShiftX = moveH * pixDistance

    ShiftY = moveY * pixDistance

    TileEngine.moveView(ShiftX, ShiftY)


    -- Tell TileEngine to update the buffer

    TileEngine.Update()


    -- finally, paint the buffer to the canvas

    Display.Paint()


end
The demo movie also includes some over-lays, including a frames-per-second counter. Both the text overlays use the "text widget" from the OpenWidgetLib. The Lingo to create a FPS counter and tell it to use a TextOverlay looks like this:
  -- Create the FPS counter

  textDisplay = script("TextDisplay.Static.WithShadow").new()

  textDisplay.Initialise(buffer, rect(10,10,150,30),

    [#fontFace:#header, #textcolour: rgb(255,255,255)])

  FPScounter = script("FPS").new()

  FPScounter.Initialise(textDisplay)
When the textDiplay widget is intialised, it is told to use the game buffer as its output image (and it is also give a rect to use on that buffer). The FPSCounter object is initialised and told to use the textDisplay object we just created as its output device. To use the FPS counter, we would modify the enterframe handler above to look like this
on enterframe (me)


    -- Handle key input

    moveH = (keyPressed(124) - keyPressed(123))

    moveY = (keyPressed(125) - keyPressed(126))

    if moveH AND moveY then pixDistance = 6.0 -- sqrt(32)

    else pixDistance = 8.0

    ShiftX = moveH * pixDistance

    ShiftY = moveY * pixDistance

    TileEngine.moveView(ShiftX, ShiftY)


    -- Tell TileEngine to update the buffer

    TileEngine.Update()


   -- Tell the FPScounter to update its display

  -- (which will update the buffer)

   FPScounter.Update()


    -- finally, paint the buffer to the canvas

    Display.Paint()


end
Note - for more information on how the 'TextDisplay.Static' script works - see Open Widget Library. For the purposes of the game discussed in this tutorial, the actual implementation of the script is mostly irrelevant. However, it is worth noting that essentially all the Open Widget Library scripts works much like the tile.Engine script - you tell the script what image to draw to, what rect to use - and it will paint text (or a button etc depending on what type of widget) to that image in response to a "Paint" command.