Isometric Game - Part 2
View Shockwave Demo | Download Source Movie
In the previous tutorial, we looked at painting a 'map' of isometric tiles to an image. In this tutorial, we will look at creating larger maps and scrolling a 'view' (rect) around.
There are basically two different approaches, each with their own advantages and disadvantages.
The first, and perhaps easiest, approach is to paint the full image into an off-screen buffer and then copy the visible section of this large image to the output canvas. The advantage of this approach is that it only involves one copyPixel command (once the initial off-screen buffer image has been painted) and is thus very quick. It is particularly useful in situations where the big background image doesn't need to be re-rendered after it has first been painted (you might paint changes to the environment - such as demolision of buildings on to it, but you do not need to loop through the map re-drawing the whole image tile-by-tile). The disadvantage is that it is fairly wasteful - you are keeping a large image (the full rendered view of the map) in memory at all times.
A second approach is to paint the current view of the map (tile-by-tile) each time, but ensuring that you only draw the tiles that are currently visible. This can be tricky with isometric maps because tall tiles, which overlap tiles above them, may be visible on the screen even though the tile base is below the current view.
The advantage of this second approach is that you can have potentially huge maps because only the tiles that are visible are drawn (you do not ever paint the entire map, only the visible portion). It is particularly suited to games where the background map changes (such as where tiles are animated). The disadvantage is that it can be slower since you are making multiple copypixels to paint the current view.
In this tutorial - which continues to look at isometric games, we are going to use the first technique. In the next tutorial (scrolling square tile games) we are going to use the second technique.
The ISO.ScrollingView script
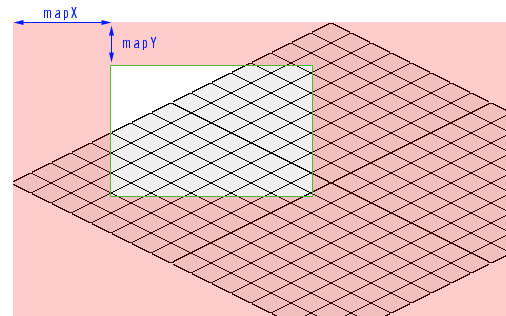
One of the main difference in this version of the script (compared to the 'fixed view' version) is the introduction of two new properties: MapX and MapX. These two properties tell us how much to move (scroll) the view rect (which is the source rect when we copy from the off-screen buffer to the output canvas).
When we initialise the map, we are now going to paint the full map into an off-screen 'buffer' image. Here is the main initialisation script that loads a map, sets up the buffer and sets up some maximun values for MapX and MapY:
on _InitialiseMap (me, aMap, baseTile, topPadding)


  -- keep a copy of the map

  mapList = aMap

  vOffset = topPadding

  NumCols = count(aMap)

  NumRows = aMap[1].count


  -- Basic info about tiles

  baseImg = baseTile.image

  Tile_W = baseImg.width

  Tile_H = baseImg.height

  basetile_offsetX = baseTile.regPoint.locH

  basetile_offsetY = baseTile.regPoint.locV


  Tile_HalfW = Tile_W/2

  Tile_HalfH = Tile_H/2

  TileRatio =  Tile_W / float(Tile_H)


  -- Setup the buffer

  bufferwidth = NumRows * Tile_HalfW + Numcols * Tile_HalfW

  bufferHeight = NumRows * Tile_HalfH + Numcols * Tile_HalfH + vOffset


  buffer = image(bufferWidth,bufferHeight,16)

  buffer.fill(buffer.rect, rgb(0,0,0))


  -- Build the map

  my = NumCols -1

  mx = NumRows -1

  hOffset = ((NumRows-1) * Tile_HalfW) - baseTile.regPoint.locH

  vOffset = vOffset + baseTile.regPoint.locV

  mapList = []

  repeat with y = 0 to my

    row = []

    repeat with x = 0 to mx

      tile = aMap[y+1][x+1]

      wx = (x * Tile_HalfW + tile.offsetX) - (y * Tile_HalfW) + hOffset

      wy = (x * Tile_HalfH - tile.offsetY) + (y * Tile_HalfH) + vOffset

      mappedTile = script("ISO.Tile.Mapped").new(tile, wx, wy)

      row.append(mappedTile)

    end repeat

    mapList.append(row)


  end repeat


  -- set some limits to the scrolling (note this only limits

  -- scrolling to within the enclosing rect.)

  MaxMapX = -(bufferwidth - RectOnCanvas.width)

  MaxMapY = -(bufferHeight - RectOnCanvas.height)


  -- set the default view ot the middle of the overall map

  MapX = MaxMapX/2

  MapY = MaxMapY/2


end
This script is using a fairly lazy approach to limiting the scrolling. With a big map, it would be possible to scroll off into the empty corners. A better limit would be to keep at least one corner for the view rect overlapping the diamond-shaped map at all times.
Because the view will move about, we need to take into account the amount of scrolling when translating a screen position (such as the mouseLoc) to an ISO coordinate. Here are the modified versions of the ISOtoWorld and WorldToISO methods:
on ISOtoWorld (me, ix, iy)

  -- returns the point in the middle of the specified tile

  wx = (ix * Tile_HalfW + basetile_offsetX) - (iy * Tile_HalfW) + hOffset

  wy = (ix * Tile_HalfH - basetile_offsetY) + (iy * Tile_HalfH) + vOffset

  wx = wx + mapX

  wy = wy + mapY

  return point(wx+Tile_HalfW,wy+Tile_HalfH)

end


on WorldToISO (me, wx, wy)

  -- returns ISO coordinates of a world point

  wx = wx - mapX

  wy = wy - mapY

  dx = wx - HOffset - Tile_W

  dy = wy - VOffset + Tile_HalfH

  x = integer((dy + dx / TileRatio) * (TileRatio / 2) / Tile_HalfW)

  y = integer((dy - dx / TileRatio) * (TileRatio / 2) / Tile_HalfW)

  if x < 0 or y < 0 then return 0

  if x >= (NumRows) or y >= (NumCols) then return 0

  return point(x,y)

end
The actual methods to scroll the view are quite simple. The first method adds a the amount to scroll, and the second simply sets the MapX and MapY values (so we can jump the view to a new position. In both cases, we will check that the scroll stays within the predefined limits.
on MoveView (me, x, y)

  -- scroll the view by the specifed amounts

  mapX = max(MaxMapX, min(0, mapX + x))

  mapY = max(MaxMapY, min(0, mapY + y))

end


on MoveViewTo (me, newX, newY)

  -- scroll the view to the specified position

  mapX = max(MaxMapX, min(0, newX))

  mapY = max(MaxMapY, min(0, newY))

end
The other main change to the script is the painting methods. Since we want to minimise the number of times we will repaint the whole buffer (which will be slow), hilighted tiles will be painted straight to the canvas (rather than to the buffer).
on RepaintBuffer (me)

  buffer.fill(buffer.rect, rgb(0,0,0))

  repeat with y = 1 to numRows

    call(#Paint, mapList[y], Buffer)

  end repeat

end


on PaintBufferToCanvas (me)

  -- Paint the buffer on to the canvas

  srcRect = RectOnCanvas.offset(-mapX, -mapY)

  Canvas.copyPixels(buffer, RectOnCanvas, srcRect)

  -- Paint the hilight directly to the canvas

  if HilightedTile <> VOID then

    r =  baseImg.rect.offset(HilightedTile.x + mapX, HilightedTile.y + mapY)

    -- lazy check to make sure the hilight isn't painted over the edges of the

    -- specified rect on canvas

    dr = r.intersect(RectOnCanvas)

    if dr.width = r.width AND dr.height = r.height then

      Canvas.copyPixels(baseImg, dr, baseImg.rect, [#Ink: 36, blendLevel: 111])

    end if

  end if

end
The RepaintBuffer method calls the Paint method of each tile in the map and paints the entire off-screen buffer. The PaintBufferToCanvas method then copies the currect view rect from the buffer to the canvas. If there is a hilight tile, this is then painted to the canvas.
Note that if we were to hilight tiles along the edges, we would need to crop the hilight image or mask the bits that don't fit on the canvas (assuming that the canvas is bigger than the rect we are painting on to). A simpler - and less computational approach - is to simply not hilight any tiles that do not fit completely within the rect on the canvas.
Also note that the PaintBufferToCanvas simply repaints the visible portion of the buffer to the canvas regardless of whether the view has changed. If the only thing that could change the view is scrolling around, then a simple way to optimise this script would be to check whether the MapX or MapX value has change since the last time the buffer was painted. In practice, however, there will be different things that could change the view (animated 'sprites' moving around etc). Different techniques for optimising screen-redraws (such as using 'Dirty Rects') will be outlined in another tutorial.
A behaviour to create and interact with the scrolling ISO View
To initialise the "ISO.Engine" script, we need to specify a canvas (an image) and a rect on this image. The following behaviour specifies the stage as the output cavas, and a rect on it.
To scroll the map using the keyboard arrow keys, we check whether an arrow key has been pressed every enterframe and then decide on how many pixels to move the map.
property Tiler


on beginSprite (me)

  Tiler = script("ISO.Engine").new()

  Tiler.Initialise((the stage).image, rect(0,0, 640, 340))

  me.newRandomMap()

end


on enterframe (me)

  -- Handle key input

  me.HandleKeyInput()

  --	paint the buffer to the canvas

  Tiler.PaintBufferToCanvas()

end


on HandleKeyInput (me)

  moveH = (keyPressed(123)- keyPressed(124))

  moveY = (keyPressed(126)- keyPressed(125))

  if moveH AND moveY then pixDistance = 4.2 -- sqrt((6^2)/2)

  else pixDistance = 6.0

  ShiftX = moveH * pixDistance

  ShiftY = moveY * pixDistance

  Tiler.moveView(ShiftX, ShiftY)

end


on newRandomMap (me)

  -- A map is a list of rows (which are lists of tiles)

  -- Each 'tile' is represented by an object created from the

  -- "ISO.tile" script.


  aList= []

  repeat with  y = 1 to 100

    aRow = []

    repeat with x = 1 to 100

      if random(10) = 1 then t = ("tile"&random(4,5))

      else t = ("tile" & random(3))

      tileObj = script("ISO.tile").new(t)

      aRow.append(tileObj)

    end repeat

    alist.append(arow)

  end repeat

  put Tiler.LoadMap(aList, member("tile0"), 20, me)

end
Adding Characters
One of the limitations with this version of the ISO.Engine will become apparent when we start adding characters to the map and we want to show them behind objects in the forground. For one, or very few characters, we can check whether a tile below the character overlaps the character - and redraw those tiles after we have added the character. If we have many characters, it might be more effecient to re-paint the visible part of the buffer, inserting characters in the same routine that we paint the background tiles.
Techniques for adding characters (and handling the z-order issues) will be discussed in the next tutorials.
The Full Script
Download Source Movie for the finished script.